BlueCamroo Release Notes 2.5.0
What's New in BlueCamroo?
BlueCamroo's March release brings you some valuable new features and a number of small enhancements to existing functions. Key additions are Extra Data Objects (which allow you to create custom databases); a new approach to capturing data using Social Network Scout; the ability to generate sales quotes straight from Opportunities; and semi-automated posting of billable time for invoicing.
Please read below for detailed overviews of these updates, and how to take advantage of them in your BlueCamroo account.
Social Network Scout
Profile Data is just a click away
BlueCamroo’s Social Network Scout module remains one of the best ways to tap into the power of online social networks to find and support customers, and gain market insight.
With so many of you giving us great feedback about how it’s already helping you to pin-point sales opportunities and other valuable market intelligence, we’ve left the core search functionality alone and just focused on making it even easier to spot valuable prospects and migrate them into your CRM database.
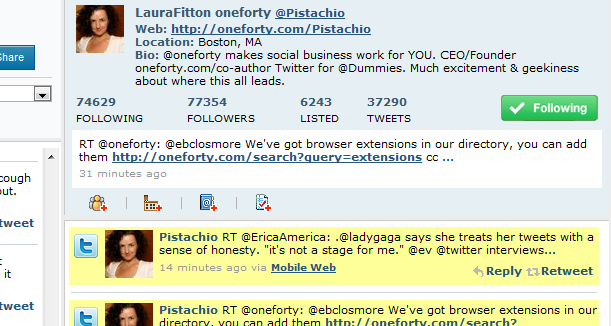
Next time you check in to the Social Network Scout pages, you’ll see we’ve removed the mouse-over boxes that you used to use to capture data into BlueCamroo. Instead, now just click on any user name or profile image and that user’s profile and recent updates are shown in the right hand side of the screen, giving you immediate access to full profile data without leaving the page.
Add data without leaving the page
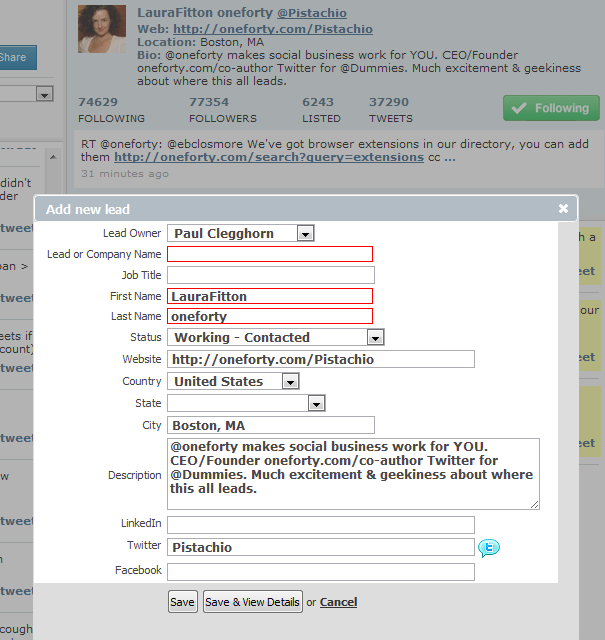
When you click any of the ‘add’ links – for example to add an interesting online contact as a Lead – BlueCamroo now enables you to review and complete the contact information in a new dialog on the Social Network Scout main page. This means you have the user’s profile right in front of you while setting up the Lead, plus as soon as you save the current action you are back in your search results and ready to continue browsing messages for more opportunities.
Extra Data Objects
You're probably familiar with how Extra Fields let you define additional data that is important to your business into each major area of BlueCamroo. Now we're taking that concept a step further: Extra Data Objects. Extra Data Objects bring a whole new level of customization to your data capture, allowing you to add not just fields, but whole new data tables!
Setting up
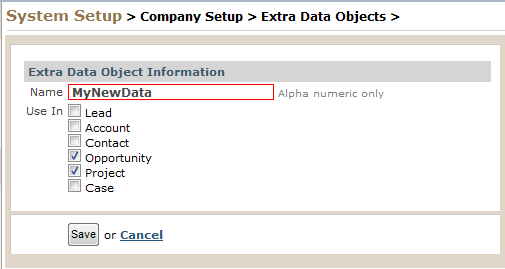
Setup | Company Setup | Extra Data Objects
Extra Data Objects are created through their own, new setup area. Setup is much like Extra Fields, except that now you are setting up whole data tables.
As with Extra Fields, you can define Extra Data Objects to relate to more than one type of ‘parent’ data object, i.e. Leads, Accounts, Opportunities etc. And BlueCamroo is smart enough to assume, if you set up an Extra Data Object to apply to both Leads and Accounts, for example, that you’ll want data attached to a Lead to migrate over to the Account when you convert the Lead.
Working with Extra Data Objects
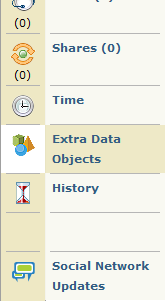
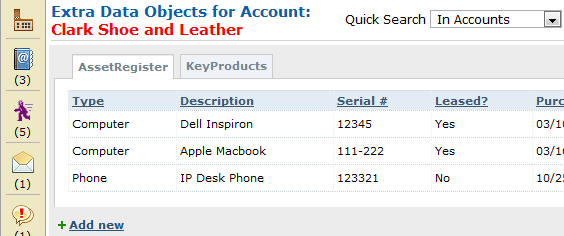
When Extra Data Objects are defined for any ‘parent’ object type – such as Leads, Opportunities, or Cases – an extra Icon is inserted in the left hand navigation.
Simply click on the Extra Data Objects icon to start adding and managing your extra data.
Note: Extra Data Objects can be used in many Searches, Views, Reports and Workflow Rules, so experiment and see how much more intelligence you can build up about your customers with your own custom-defined data tables.
Sales Quotations
The Opportunities section in BlueCamroo lets you enter and track details of Sales Opportunities. This is a great way to keep on top of your sales pipeline, for instance by using the standard Opportunity Sales Pipeline report. Now, it can do more…
With this month’s update, we’ve added the ability to generate and send a Sales Quotation straight from the Opportunity record.
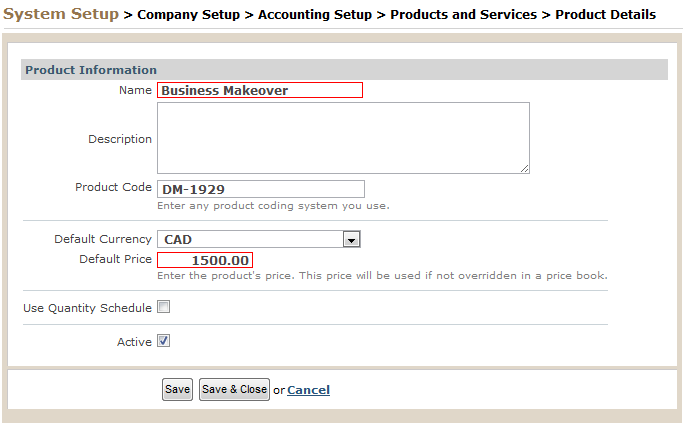
Setting up – Products and Services
Setup | Company Setup | Accounting Setup |Products and Services
Sales Quotations are built up by applying Products to an Opportunity, so if you haven’t already done so, now is the time to set up some Products and Services.
Setting up – Sales Quote Template
Setup | Company Setup | Accounting Setup |Sales Quote Template
We’ve added a pre-configured Sales Quote Template to your BlueCamroo setup. If you would like to change this, for example to add your logo or include summary Terms of Business, you can update it via Setup.
Setting up – Sales Quote Emails
Setup | Company Setup | Automation |Email / Message Templates
Three new Email / Message Templates have been created.
Sales Quote Notification: This email is generated when you send a Sales Quote to your customer. The Quote itself is attached to this email, together with any other attachment you add.
Sales Quote Accept: This email is sent to the Opportunity Owner when a Sales Quote is accepted.
Sales Quote Decline: This email is sent to the Opportunity Owner when a Sales Quote is declined.
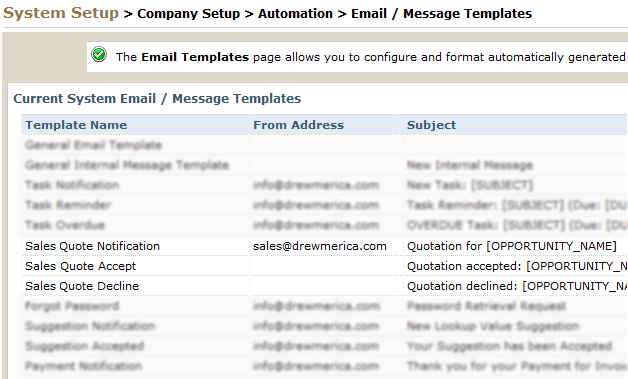
You can edit all these emails to get them just the way you want them.
Creating and Sending a Sales Quote
Sales Quotes are created from the Products and Sales Quotes page of an Opportunity (formerly just the Products page).
After creating your Opportunity, click the new Products and Sales Quotes icon to start adding Products.
Tip: You can add a description for each Product if you choose, which will be shown on the Sales Quotation.
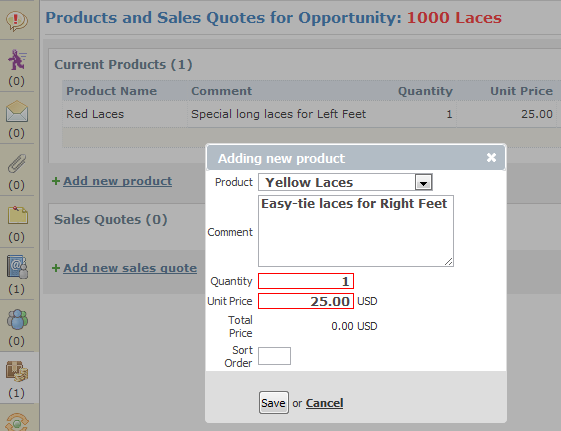
When you have added all your Products, click ‘Add new sales quote’ to create your quote.
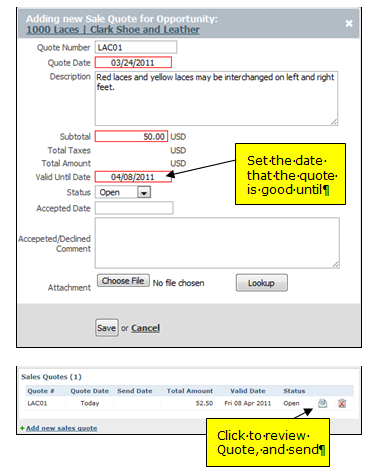
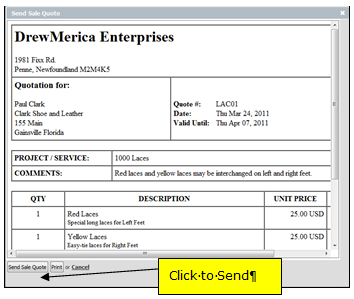
BlueCamroo will now send your Sales Quote to the customer, and provide a link for the customer to Accept or Decline the quote.
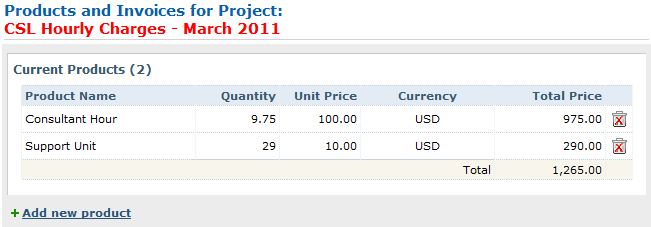
Invoice Selected Products / Services
A small but significant update this month is that when invoicing a Project, it is now possible to select which Products you wish to invoice, leaving other Products for later invoicing.
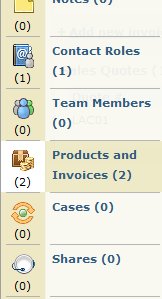
To bring this together, the old Product page and Invoices page within Projects have been combined, to create a new Products and Invoices Page.
Additionally, if the Project was created by converting and Opportunity where a Sales Quote had been issued, details of the Sales Quote will also be displayed on this page.
Invoicing Billable Time
BlueCamroo already allows you to track your time, by entering time spent directly as Timesheet entries, and by recording time whenever you complete a Task. Every time entry can be marked ‘billable’, or left non-billable.
If you are already using Timesheets to track billable time, you’ll know how to export your time records so that you can use them to work out client billing. With this release, you can now work out client billing inside BlueCamroo, creating a joined-up process for tracking and billing time.
Billing Time – Process Overview
Billing time within BlueCamroo goes through four major step:
Step 1 – Track billable time. As now, this is a matter of ensuring that all your chargeable personnel keep good activity records, using the convenient tools within BlueCamroo to record their time, and allocate it correctly to Accounts and/or Projects.
Step 2 – Calculate charges. Anyone who manages invoicing in a business that charges for time knows this is not a trivial task. Different charging rates for different personnel; different rules for rounding time up or down; overtime; discretionary adjustments. All these considerations make calculating invoices an art as well as a science. BlueCamroo will help you in all these areas.
Step 3 – Create ‘Products’. Our solution for billing time fits right in with the way you manage all invoicing in BlueCamroo – via Products. So the third step of our time billing process converts analyzed time records into Products, ready to be added to your Invoices in exactly the same way as discussed in the previous sections of this Release Note. Using Products as a step between Time and Invoices means you get all the benefits of Product price tariffs and Price Books applied to billing time, automatically.
Step 4 – Invoice. Exactly as described above, billable time ‘Products’ are dropped into invoices and mailed to your client for payment.
Steps 1 and 4 should by now be familiar to you, so the following sections walk through Steps 2 and 3.
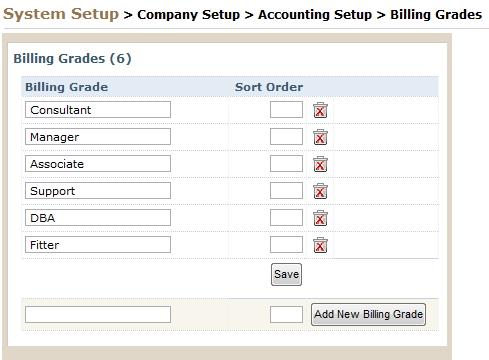
Setting up – Define Billing Grades
Setup | Company Setup | Accounting Setup | Billing Grades
Most firms that bill chargeable time have a number of Grades of personnel, with different charging rates for each Grade. The first step of setting up to bill time is therefore to define your Billing Grades. Your completed setup should look something like this:
Setting up – Assign Default Billing Grades for All Staff
Personnel are assigned Billing Grades through (at least!) three methods:
Company-wide Default Billing Grade
Setup | Company Defaults | Company Details
Any staff member whose Billing Grade is not defined anywhere else will pick up the Default Billing Grade for your company as a whole. In Company Details, set your default ‘All Staff’ Billing Grade.
User Group Billing Grade
Setup | Company Setup | Access Rights |User Groups
A staff member who’s in a User Group can pick up the Billing Grade for members of that Group. You don’t have to set up Billing Grades for User Groups, but if you do, the User Group Billing Grade will override the general company-wide default Billing Grade from Company Details. (If you put a user in multiple User Groups with different Billing Grades, the Billing Grade from the first-added User Group will apply.)
User Billing Grade
Setup | Company Setup | Access Rights |Users
It is also possible to define the default Billing Grade for an individual User. You don’t have to set up User Billing Grades, but if you do the Billing Grade for the User will override the Billing Grade from any User Group, and the company-wide Default Billing Grade.
Setting up – Define Time-Related Products / Services
Setup | Company Setup | Accounting Setup |Products and Services
Remember, billing for Time is going to work just like billing for any other product, so what are the actual units of time that you bill in your business?
For example, you might bill:
“Consultant hour”
“Manager day”
“Support call”
“Technician Hour”
“Technician Overtime Hour”
Think through the ways you like to bill time, and then add these as Products, just as you would add any other Product.
Setting up – Billing Rules
Setup | Company Setup | Accounting Setup |Billing Rules
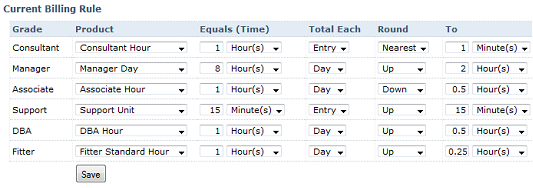
This is the part of the setup that pulls everything else together. Your Billing Rules determine how each piece of billable time recorded on team-members’ timesheets gets mapped onto Products, that you can then apply to Invoices.
Billing Rules define, for each Billing Grade, the Product to which time should accumulate, and how time is totaled up and, if applicable, rounded off.
Analyzing Billable Time
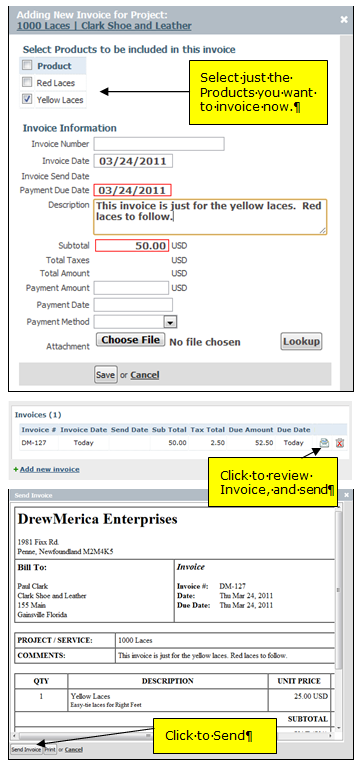
With this release, whenever you inspect time for an Account or a Project where there is un-billed Time accumulated, you’ll see a series of check-boxes, and new buttons at the bottom of the page.
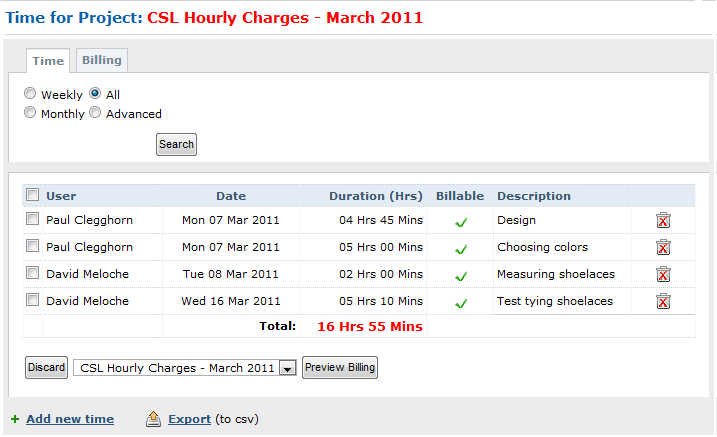
Select the time items you wish to bill, and click ‘Preview Billing’ to see how your Billing Rules map time onto Products:
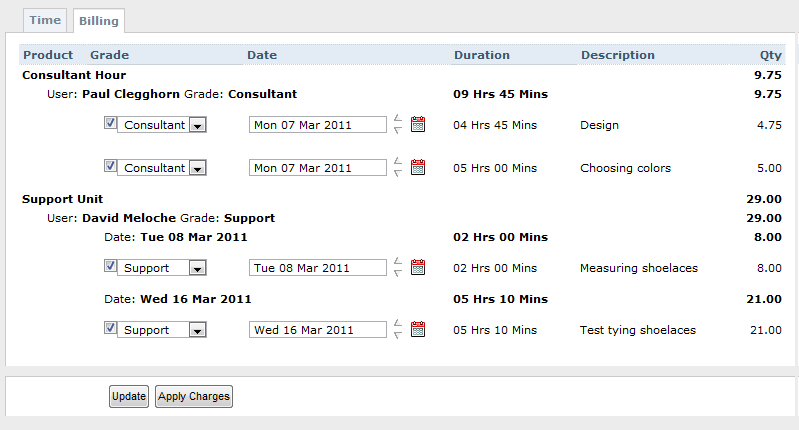
In this screen you can adjust dates and Billing Grades to fine tune your time assignment, before finally clicking ‘Apply Charges’ to insert Products into the Project:
So there you have it: Time analyzed from your Timesheets, and inserted as Products into your Project, ready to Invoice!
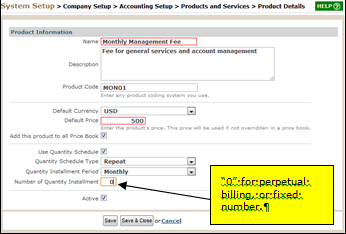
Recurring Products / Services
Setup | Company Setup | Accounting Setup |Products and Services
Continuing with our focus on Products / Services and Invoicing in this release, we’ve added the capability to define a Recurring Product. Recurring Products enable you to charge for subscription services and other multiple payments.
When setting up a Product, check the ‘Use Quantity Schedule’ box to access recurring billing rules.
(Recurring Products are added to an Invoice in the normal way, but only the first occurrence must be created / sent manually. All subsequent occurrences send automatically.)
PayPal Website Payments Standard
Setup | Company Setup | Accounting Setup |Payment Processors
BlueCamroo already supports Paypal Website Payments Pro, however the monthly charges and vetting delays for Website Payments Pro can be an obstacle to getting started. To help you accept payment online for Invoices with the minimum of delay, we now offer the ability to link through to Website Payments Standard.
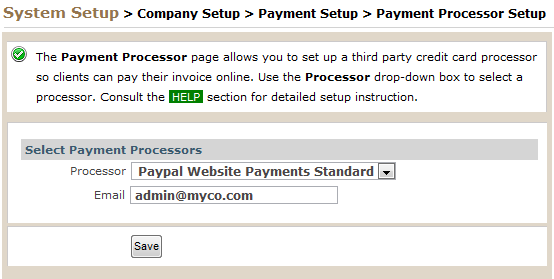
(Website Payments Standard is Paypal’s entry-level service, allowing you to transact payments entirely on the Paypal site. You can register for Website Payments Standard with no more than an email address.)
Project Templates – Assign Tasks by Role
When creating a Project Template, you are able to define Project Stages and Project Tasks, that will be built into every new Project created from that Template.
Up until now, Tasks could be unassigned – requiring you to assign the tasks after creating each Project – or assigned to named individuals.
With this release you can now assign tasks to Project Team-Member Roles, or to the Project Owner or Stage Owner.
After creating a Project from the Template, simply assign Team Members before populating dates. Populate Dates process will now populate both the stage/task dates and also the task assignments.
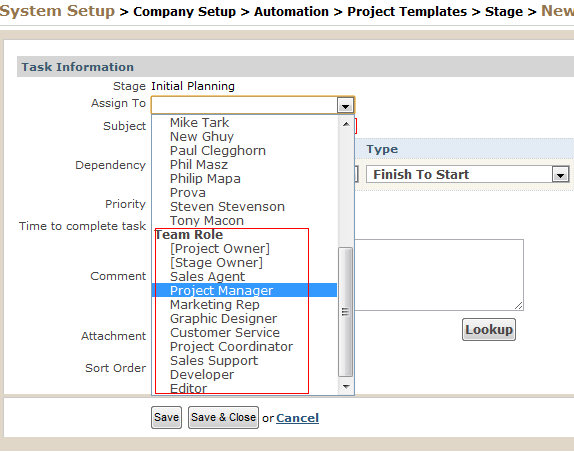
For example, if you set a task owner to be Sales Agent in the template, when you create the project from the template, BlueCamroo will look at the Team Members page and give ownership to whichever user is listed as the Sales Agent.
Other Enhancements
What's New by Section
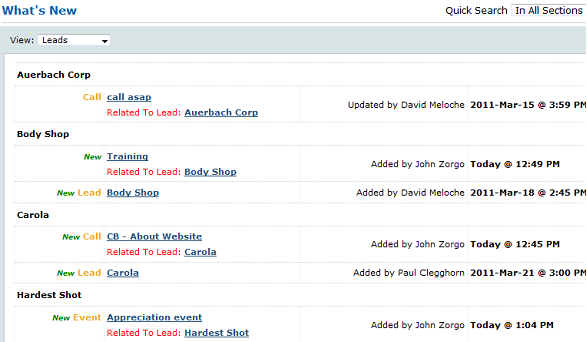
You can now filter items under the What's New page by section (e.g., leads, accounts, etc).
Show all related Emails and Attachments for Account
The Account message page now has a Related to Account Only tab and an All Messages tab. The Account Only tab displays messages directly related to the account only.
All Messages tab will show you a unified collect of all messages generated by the account and sub-objects (e.g., task acceptances, invoices sent, campaign manager emails, etc.).

The accounts Attachments page likewise allows you to see attachments added at the account level as well as attachments added for all account sub-sections.
Workflow Rules
The Workflow Rules page better organizes workflow rules via section, object, and sub-object. When setting up criteria for a workflow rule that operates on a sub-object, you can now setup logic that for the sub-object's properties as well as the parent object's properties.
Workflow Rules Emails also now let you add in placeholders for extra fields you've created for the object. For example, if you're creating a workflow rule for a Lead and you've created extra fields for Leads, you can include these extra fields in the Workflow email using the [p] button on the WCE toolbar.
Deleting To-Dos
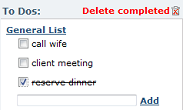
You can now permanently delete a completed to-do item from the right-pane. After clicking on the to-do item, a small trash can icon will appear. Click the trash can icon to remove the completed to-do from your list.
