Permission to Share
One of the first questions prospective users of BlueCamroo ask us is who can see what in BlueCamroo. Can everybody see everything? The short answer is no. The long answer is "sure, if you really, really want it that way."
To understand who can see what, you have to understand BlueCamroo's Permissions system. Permissions in BlueCamroo (and nearly every other application or computer system) implies two things:
1) What can I see?
2) What can I do to what I see?
The First Law of BlueCamroo permissions is this:
You can only see what you yourself have created. No one else can see it. You can't see what they've created.
This is called ownership in BlueCamroo. What you own you can edit and delete. Every record in the system (a lead, an account, a case, etc.) has an owner.
So, if you create a lead (i.e., you're the owner), only you can see it, change it, delete it. Absolutely, no other user in the system can see it or edit it.
But as we know, there are no absolutes. A few qualifications to that "absolute".
System administrator accounts can see anything. The system administrator or the admin is the person who has ultimately responsibility for setting up and maintaining BlueCamroo. If you're the boss, you should get to see everything.
The Second Law of BlueCamroo permissions is this:
Sharing is good.
Selling, delivering projects, and helping clients are part of a team effort. The leads, accounts, projects, and cases you own you will, no doubt, need to share with other team members. You can't go it alone. If we didn't need company, we wouldn't call them companies.
There are many ways to share what you own. The most basic way to share a record is access the record and then click the record's Shares button on the left toolbar.
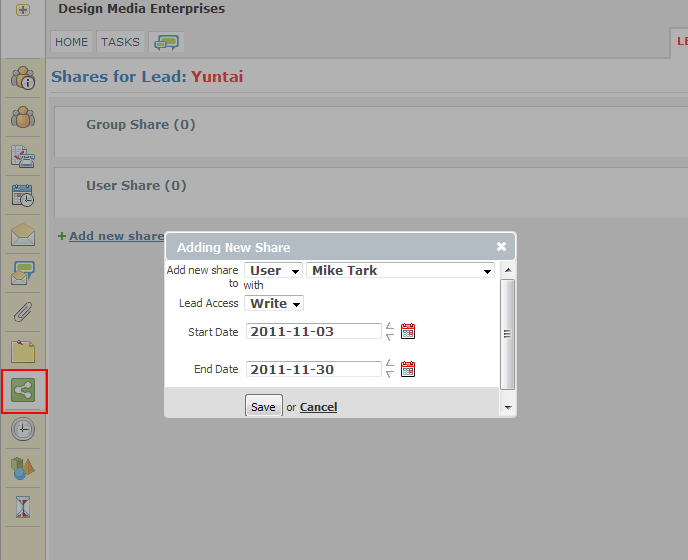
The Adding New Share dialog box lets you specify who else in your company can access your record (what can they see?) as well as what level of access they have to the record (what can they do to it?). The Add New Share To drop-down box lets you specify which users you want to share the record with. If you want to share it with a particular user, select User and then the user name from the drop-down boxes. You can also share it with a User Group. If you're unfamiliar with User Groups, we'll deal with them later. Suffice it to say, a User Group is a collection of users created under Setup. It's a quick way to "batch up" other users who perform similar functions.
Next you have to determine actual permissions. BlueCamroo uses a None/Read/Write permission system familiar to most users of computers. But let's review what those mean in context of BlueCamroo.
None: The user has no right to even see this record. You may wonder why you'd want to set up a share that doesn't actually share anything. But there is a logic. Let's say you share this record with a User Group but you don't want to share it with one particular member of the group. So, you set up one Share condition with the group (say giving them Read rights) and then setup a second share condition with the particular user and giving that user None rights. In BlueCamroo permissions set for individual users always take precedent over set at the group level.
Read: The user can read the record but can't modify it.
Write: The user can read the record plus modify it and even delete it.
The dialog box also has Start/End Date fields. By default a share is permanent. But you can set up a share to begin/end on specific dates.
If you click on a tab like Leads or Accounts, you'll notice there's a Shares button at the top level. This is the Mass Assign Share option. It's similar to sharing an individual record but allows you to share multiple records at once based on search criteria. For example, you might want to share all leads in a given territory with another user.
Transferring Ownership
![]()
From the top tab level, you can not only mass share but you can actually transfer ownership of records. Let's say you own a large number of accounts for a particular state but you need to transfer those accounts to coworker. Simply click Mass Update on the left toolbar. Setup some standard search criteria, click Search to locate the records. Select the records. Now use the Field Name drop-down box to select Owner. In the Field Value drop-down box select the name of the new owner. Click Mass Update.
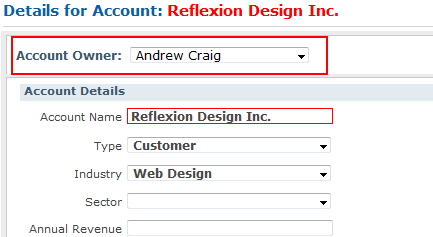
Ownership can also be re-assigned on a record by record basis by simply opening a record, clicking Edit Details, and then using the Owner drop-down box (located at the top of the record) to select the new owner. Remember if you do this, you might (depending on sharing conditions) lose the ability to access your record.
Giving Users Access to Projects and Opportunities but not Accounts
Projects and Opportunities present another way to share but still limit another user's access. Suppose you have a project you need another user to do work on, say he/she is responsible for completing several project tasks. However, you do not want the user to have any knowledge about the account itself. The easiest way to do this is bring the user aboard the project as a team member. Open the Account's list of projects.
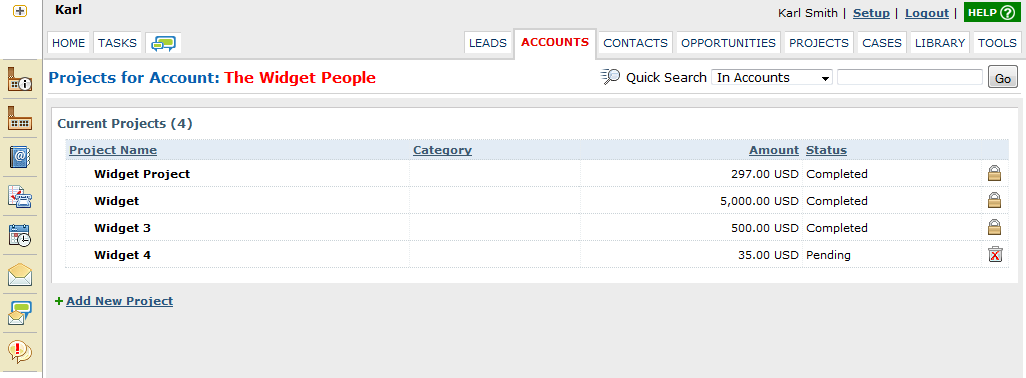
Open the project in question. Click the Team Members button on the left toolbar.
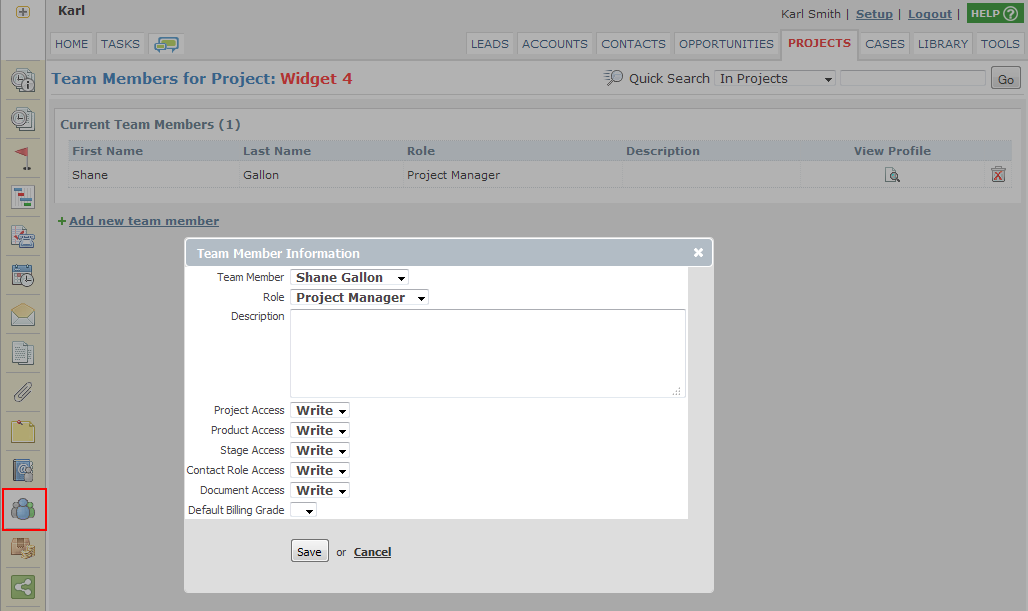
Assign the user as a team member and issue the user appropriate permissions to the project and features of the project. Click Save.
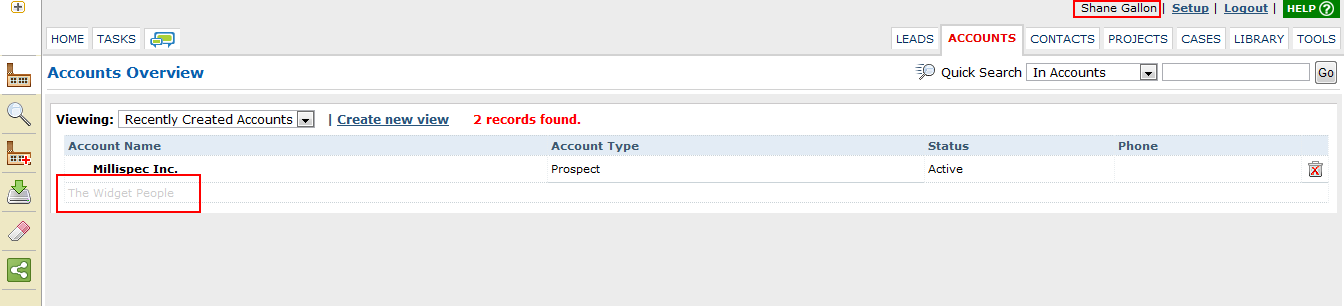
You can see here, the user Shane does not have access to the account itself. However, when Shane clicks on the Projects tab and views projects by Projects I Work On, Shane has access to the project itself.

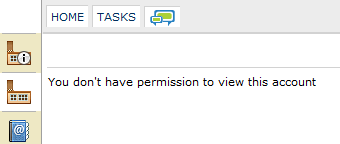
Should Shane sneakily try to access the account via the Project's summary pane, Shane will see:
Manager Permission
Another way of sharing is by identifying who the user's manager is. An Admin user will need to set this under Setup. Access System Setup > Company Setup > Access and Rights > Users. Locate and open the internal user. In the Personal Details section there is a Manager drop-down box. Set the user's manager.
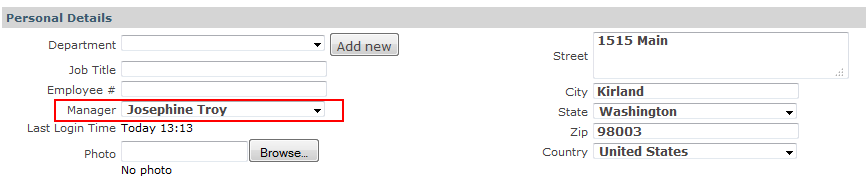
In the pictured example, Josephine, once identified as Shane's manager, will be able to view and edit Shane's records. Josephine can likewise have a manager set up for her. Let's say Karl is identified as Josephine's manager. Karl will be able to edit Josephine's records. BlueCamroo will also read the hierarchy and allow Karl to view any of Josephine's subordinate records. So Karl can see the records Josephine owns as well as the records her subordinate Shane owns.
Default Access
Permissions don't only extend to records themselves. Admins can turn on and off a user's ability to access various features of the program. Access is set in upside down pyramid style.
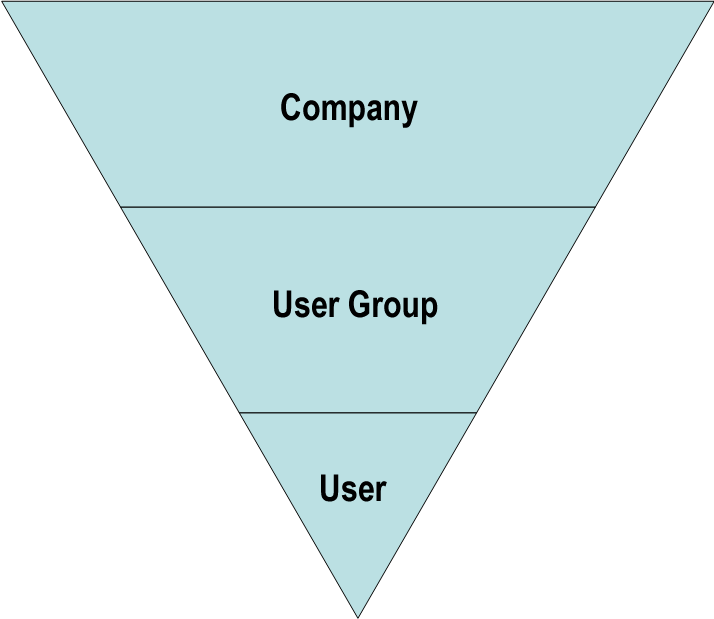
Company
To set company wide permissions, select System Setup > Company Defaults > Design Media Enterprises Company Details. You'll notice the Access Rights drop-down boxes are related to the various tabs and left toolbar options.
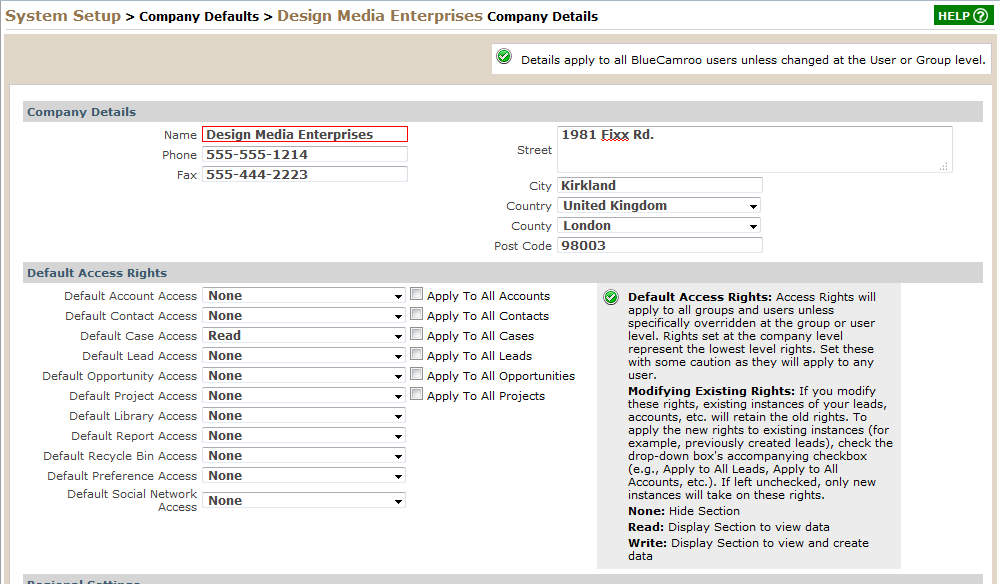
At the company level, you're setting a user's initial access. This is access every user will have by default. You might want to keep these settings restrictive. Do all users need to access the Projects tab, for example?
User Groups
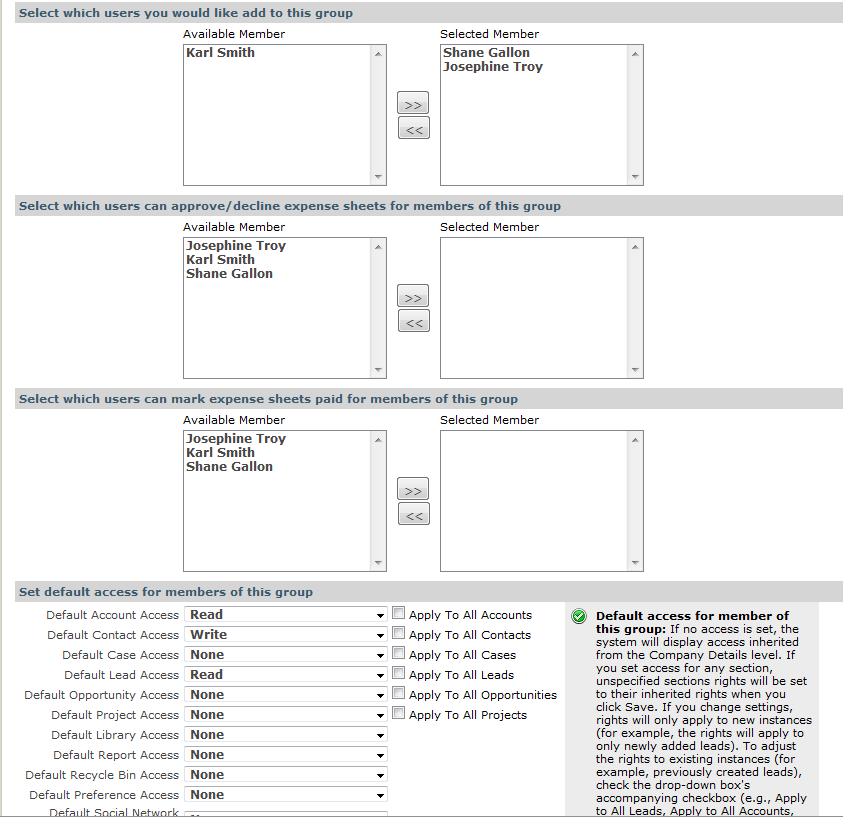
When I discussed sharing above, I mentioned User Groups. System Setup > Company Setup > Access and Rights > User Groups is where you can set up these groups. By default there are some hardcoded groups, notably the System Administrator group. Any user added to this group will have "all access" admin powers. For the purposes of this blog we'll ignore the expense features. Create a group, add members to the group, and then set default access for group members. This is probably the primary way you should be giving users expanded access to BlueCamroo.
Add your users to functional groups. As part of a group, they will enjoy the same access as all other members of the group. Whatever access is set in this group takes priority over Company access. If a user has Write access to Cases at the Company level but has Read access to Cases at the Group level, the user will have Read access. Users can be part of two or more groups. If there's a conflict, the user will always have the more permissive rights. So if the user is part of a Sales group and has Read rights to the Cases section and Write rights to the Cases section as part of a developer group, BlueCamroo will default to the more permissive Write rights.
Users
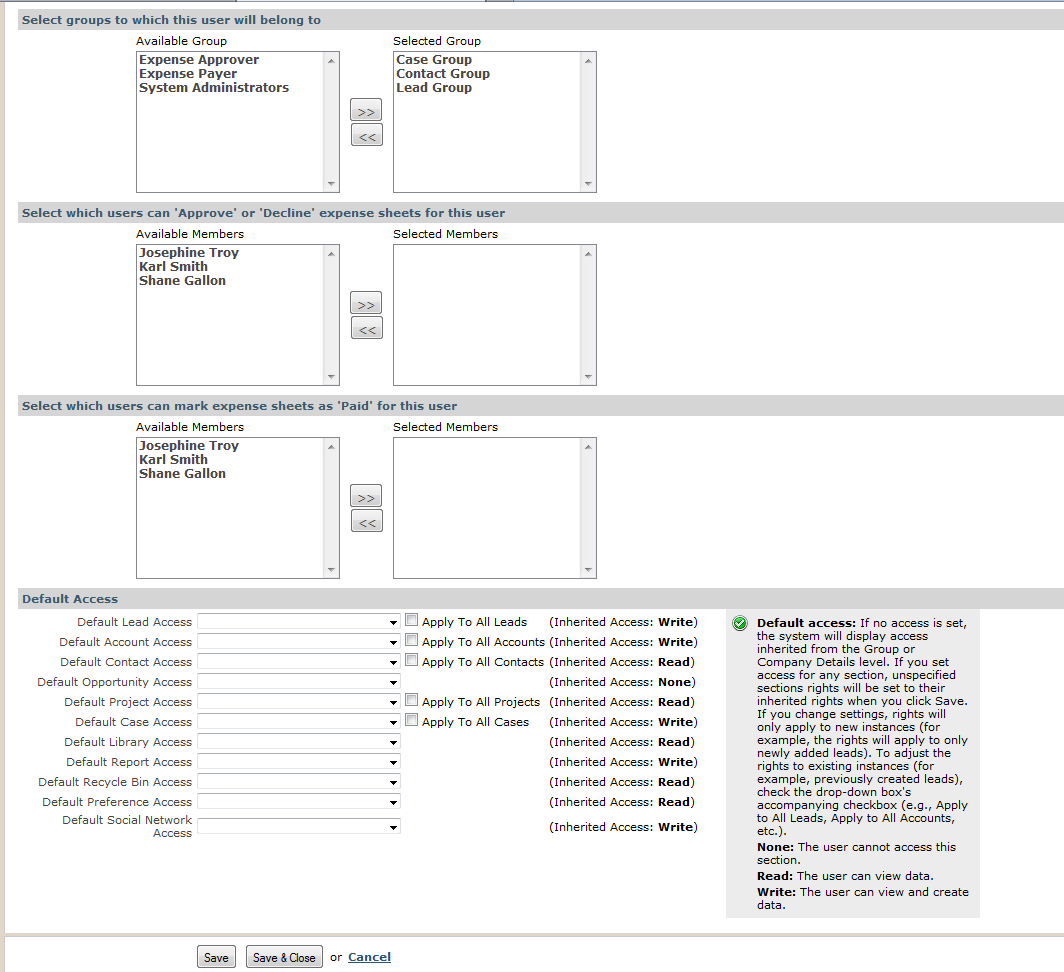
The most granular level for setting access is on per user basis. You can do this by accessing System Setup > Company Setup > Access and Rights > Users and selecting an internal user. This is useful if a user generally fits in one user group but needs slightly tweaked rights. For example, the user is a support person and is added to a support user group. Support members don't bring in leads so they would have None rights to the Leads tab. However, this user tends to bring in a lot of leads. Therefore the admin might want to access the user's details page and give this user Write access. The User access setting take priority over settings at the user group level and the company level.
The Really Tricky Stuff
Okay now that we've talked about User Groups, there's one more way you can share records. You can create automatic sharing between user groups. Let's say you have a Support User group. It stands to reason for any Case record a Support member creates, you might want the system to automatically share it with members of the Account Manager group.
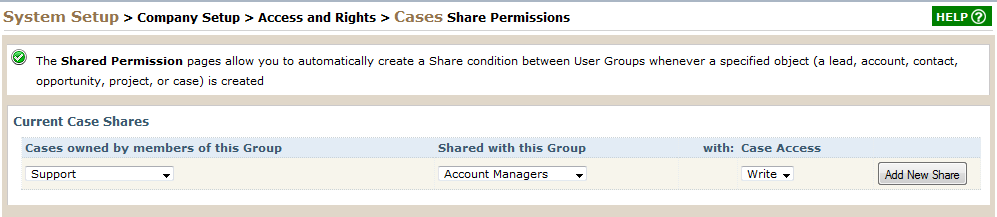
To create this kind of automatic sharing arrangement, access System Setup > Company Setup > Users and Permissions > Shared Permissions. Select which type of record you want to create automatic sharing arrangements for (say, Cases). In the first drop-down box, select which group creates the record. In the second drop-down box, select which user group these records should be shared with. Finally, use the third drop-down box to specify what level of access the second group should have. In the pictured example, this Shared Permissions setting will have the following effect: any time a user who belongs to the Support user group creates a case any member of the Account Managers user group automatically gets Write access to that case.
- Solution
- Pricing
- How Your Business Runs
- Developers
- API Documentation

©2026 BlueCamroo Inc. All righs reserved