BlueCamroo Release Notes 5.6.0
What's New in BlueCamroo?
The latest release for BlueCamroo adds all-new Estimate and Budget functionality. As your Project progresses and usage of Time, Products, Supplies and Other Costs is gradually recorded, you will be able to see how well your actual Projects costs are doing vs. your Budgeted costs and whether you need to make any changes in the future.
Key:

New Feature

Change to Existing Feature

Setup Instructions
Introducing Estimates and Budgets
Projects are an important part of BlueCamroo and as part of our ongoing improvements to Project Management functionality, we are happy to announce that one of the most requested features, Estimates and Budgets, are now live!
Budgets are something that every company needs to manage. Budgets help save time and money, and can help to increase profits. They serve as guidelines for spending resources (which include Supplies, Products, employee Time, etc.) on Projects.
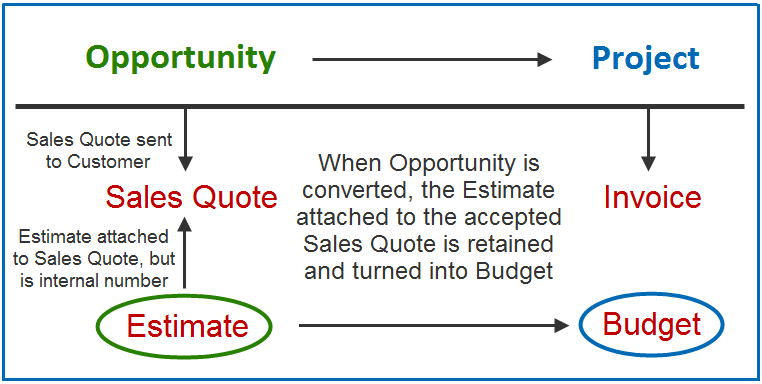
In BlueCamroo’s Project Cycle, Opportunities are precursors to Projects. They are part of the Sales process of trying to sell a ‘project’ to a Lead or Customer. Simply stated, Opportunities are all about a Business Proposal; the actual details of the Opportunity is the proposed project, the Sales Quote is the proposed price, and the Estimate is the estimated internal cost for the proposed Project (Products, Supplies, Time, etc.). If you are Quoting your Lead or Customer multiple options, each will have a different Estimate to satisfy a different requirement.
Once the Opportunity is accepted, you convert the Opportunity into a Project one of those ‘Proposals’ become reality. The Estimate turns into a Budget which is the expected internal cost of the Project. As the Project progresses, those real costs will be tallied and can be compared to your Budget. This will give you useful statistics, such as what the Project is costing you, what part of a Project is being delivered over Budget, or whether you need to adjust the price of the Project, and much more.

If your process doesn’t include Opportunities, or you are just using Project functionality in BlueCamroo, you do not need to create an Opportunity and Estimate before creating a Project and a Budget.
We’ll start with a quick overview of how to get set up before starting with Estimates and Budgets in BlueCamroo, and then cover the process and flow of how to best use these new features. Finally, we’ll cover any other changes and additions that have been made in BlueCamroo in this release.
Setup: Estimates and Budgets - For Administrators
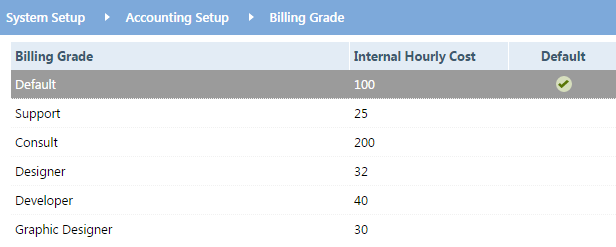
Before you begin, you’ll need to set up Cost Grades for your different user groups. Cost Grades are a new feature that let you specify internal cost per hour that is applied to the hours worked by a user or group of users.
It is important to differentiate Cost Grades from Billing Grades. Billing Grades are the Billing value that you quote to customers which is applied to the hours a specific user or user group work. For example, you may have two levels of developers; Junior and Senior. Both work 8 hours a day, except they are paid different amounts (Cost Grade), and you charge different amounts to your customer for an hour of their work (Billing Grade).
Note: Cost Grades are a part of Billing Grades, except that they have a different value associated with them. You do not need to create a new field for Cost Grades, you just need to add a value to Internal Hourly Cost.
To set up Cost Grades, go to your Setup > System Setup > Accounting Setup > Billing Grades. If you have Billing Grades already set up, and you want to add Cost Grade values to existing Billing Grades, simply click the Billing Grade and click ‘Edit’ on the actions bar. If you are adding new Grades, click ‘Add New’ from the Actions Bar, fill in the name of your Billing/Cost Grade, eg. Developer, and fill in the Hourly Rate (this rate refers to their internal cost per hour), then click ‘Save’ on the Actions Bar. Then repeat the same process to create as many Billing Grades as required.
Once your Cost Grades are set up, you will need to apply them to each individual User whose hours will be tracked for Budgets. In Setup > Users and Groups > Users, click on the User you want to apply the Cost Grade to, and scroll to the Personal Settings Section. Select the Cost Grade that applies to the User from the drop-down.
|
Important! We have also added a field called Track Utilization. This field MUST be checked if you want a particular users’ Time to be applied within your Budget. For now, you can leave the target % blank. This is a field we have added for a future release of Resource Balancing. |
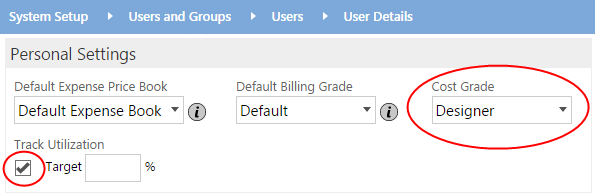

When you are done, click ‘Save’. Then repeat the above steps for any other User you wish to track Time for Project Budgets.
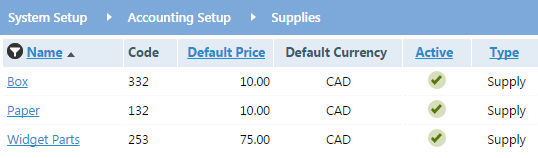
Your final step will be to make sure that you set up any supplies that you plan on Budgeting for within Projects. This can be found in your Setup under System Setup > Accounting Setup > Supplies.
Working Through Estimates and Budgets
Estimates and Budgets are essentially the same thing, except that Estimates are created for Opportunities, and turn into Budgets when the Opportunity is converted to a Project (as long as the Estimate is ‘attached’ to the accepted Sales Quote), whereas Budgets only apply to Projects. As noted earlier, you do not need to create an Estimate in order to create a Budget, but we will be detailing the full steps to create an Estimate for an Opportunity, and converting that Opportunity to a Project with a Budget.
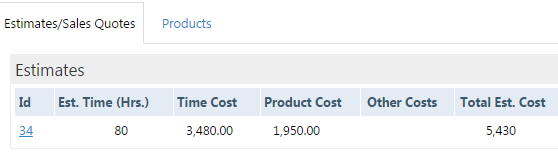
To create an Estimate, you first need to create an Opportunity and navigate to its Financial Tools section. You’ll notice that we’ve added a section for Estimates to the ‘Sales Quotes’ tab.
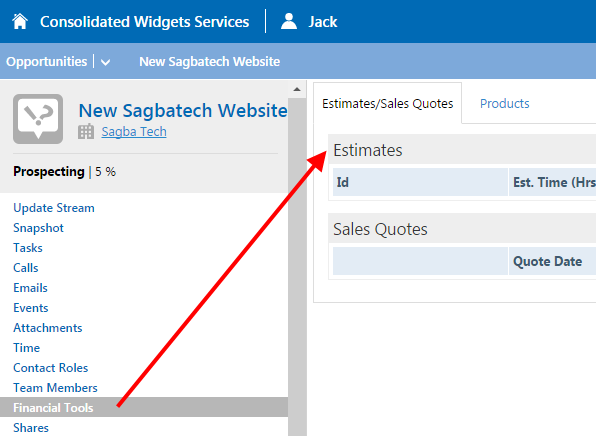
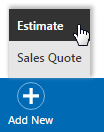
Simply mouse-over ‘Add New’ from the Actions Bar, and click ‘Estimate’.
Fill in the Description for the Estimate, then click ‘Save’.
The new Estimate will be added to the list.
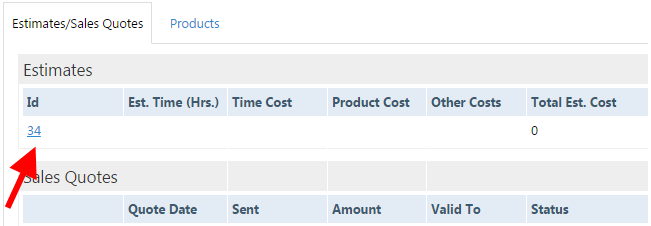
When you are ready to populate your Estimate, click on its Id number in the list. Here, you can manually add Products and Supplies (or Bundles) as well as Time.
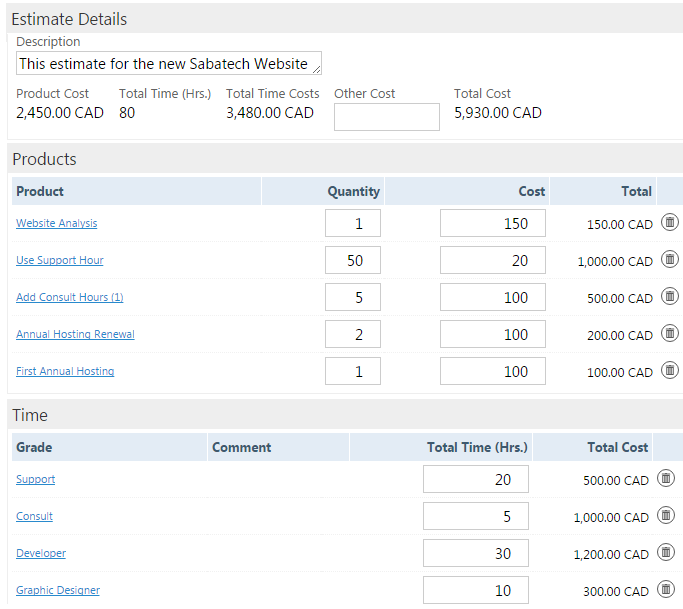
When finished, click ‘Save’ and you will see a total cost for your Estimate which tallies the cost of your Products, Supplies, Value of Time (adjusted by your Cost Grades), and any other costs you have added.
|
Important! Estimates are dependent on Sales Quotes. That is, Estimates, must be ‘attached’ to a Sales Quote. So if you offer your client more than one purchase option, you will likely be sending them several Sales Quotes, and because Estimates vary based on the work to be done, each Sales Quote will need to have its own Estimate. |
When you are satisfied with your Estimate, you can add it to its appropriate Sales Quote by clicking on the Sales Quote and selecting the Estimate from the drop-down and clicking ‘Save’ on the actions bar.
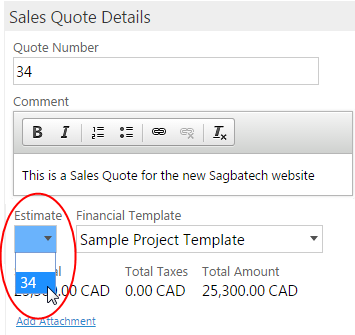
Note: Estimates are for internal use only, so when the Sales Quote is sent, you do not have to worry that your client will see your Estimate. When the Sales Quote is accepted by your client, both the Sales Quote and the Estimate become ‘locked-in’ for the Opportunity.
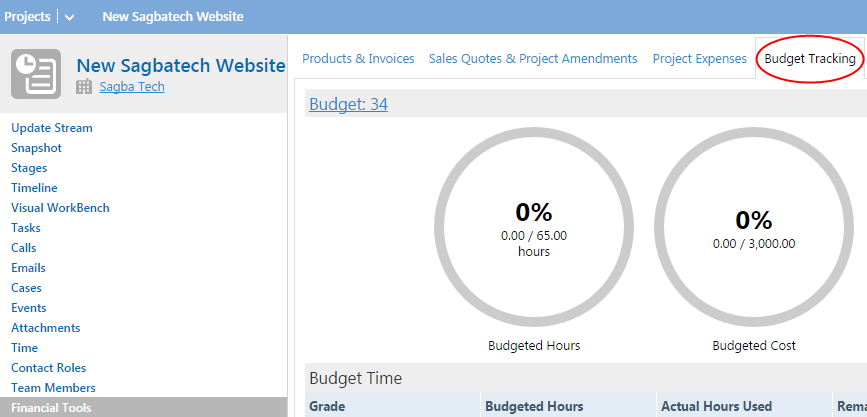
Once the Opportunity is won, convert it into a Project as usual. As with most other things within the Opportunity, Estimates will also carry over to the Project, but will instead be changed into a Budget seen in the *new* ‘Budget Tracking’ tab found in the Financial Tools section of your Project.
This is not the only way to create your Budget. Depending on your Business Process, here are all a few of the ways that you can create your Budget in BlueCamroo:
- If you followed the Estimate > Budget conversion steps, and you are comfortable with the numbers:
You can use the Estimate you created as your Budget. As mentioned above, if you have correctly followed the steps, all of the Time and Products you have added in your Estimate will carry over into your Budget.
- If you followed the Estimate > Budget conversion step but feel that your Estimate is not fully representative of your Project Budget, and you have used a Project Template in your conversion:
You can choose to retain the Estimates details and add the time from the Project template to your Budget, OR you can delete you’re the details of your Estimate and use the Time that has been set up in your Project Template.
If you choose to delete the Estimate, go to the Budget Tracking Page of your Project and click ‘Delete’ to remove the details.
Then, for both scenarios, you would click ‘Add New’ on the Budget Tracking page, fill in the description and click ‘Save’, then click on the Budget number and click ‘Import Task’ on the Actions Bar.

- If you skip Opportunities and you are creating a Project using a Project Template:
You can add all of that Project Templates time at once. Simply click ‘Add New’ on the Budget Tracking page, fill in the description and click ‘Save’, then click on the Budget number and click ‘Import Task’ on the Actions Bar.
- If you skip Opportunities and you are creating a Project from scratch (no Project Template):
You can click ‘Add New’ on the Budget Tracking page to create and Build out a new Budget.
|
Important! For the scenarios in which you have chosen to Import Tasks from a Project Template, keep in mind that this will only bring in Time from tasks:
Tasks which do not meet ALL of these requirements will not be added. Also, because only Time is being imported, remember to add your Products and Supplies if they impact your Budget. |
Keep in mind that you can always edit this Budget if something changes, but it is not recommended for most things as this will skew your Budget and you will not be able to properly see if you managed to stay on Budget.
Now, you will notice that the Budget Tracking page has been populated with Budgeted Time and Items.
Now, as the Project progresses, including adding Products and Supplies, and users are logging their Time spent on the Project (as long as their Track Utilization field is checked and they have a Cost Grade set up), you’ll notice that the other fields on the Budget Tracking Page slowly start populating, giving you an idea of how your Actual Costs are doing vs. your Budgeted Cost.
Tracking Budgets
Building up Estimates and Budgets provides you with a lot of useful information that you can use to make more informed decisions. To make this information easily accessible, we’ve added Budget Tracking.
You can find this by navigating to the Financial Tools section of a Project for which you have set up a Budget and clicking the tab called ‘Budget Tracking’ found at the top of the Center Pane.

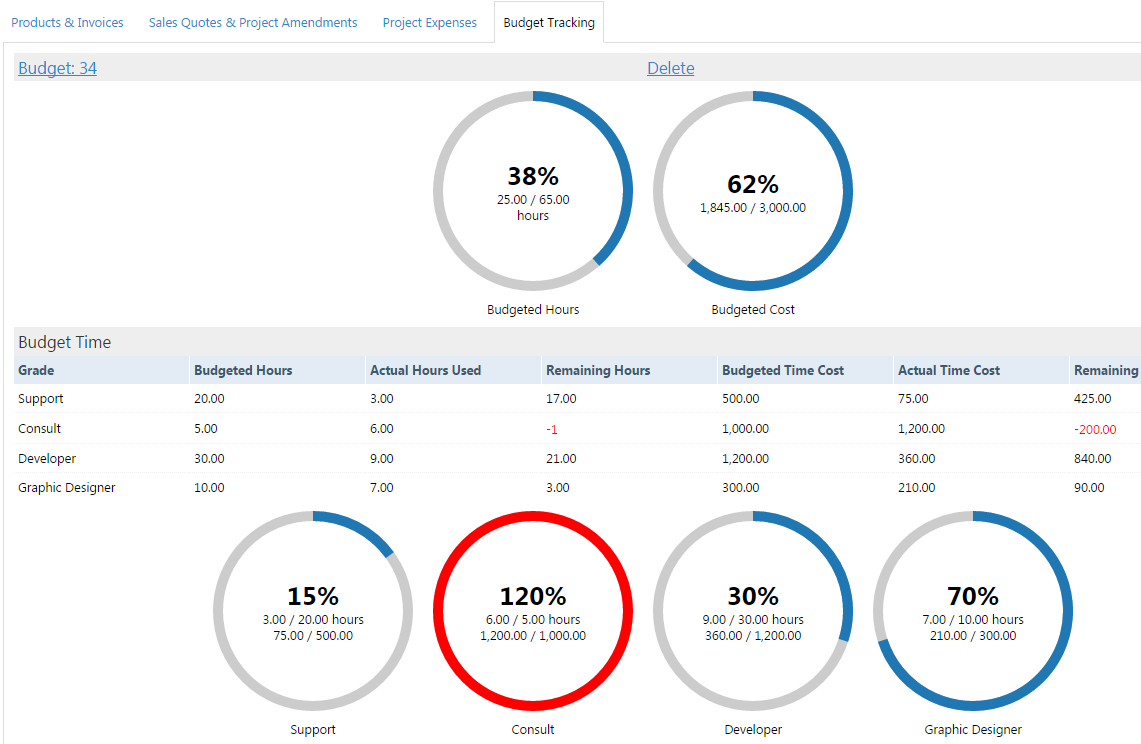
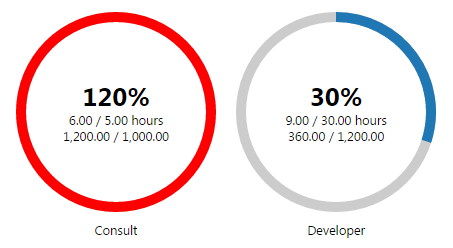
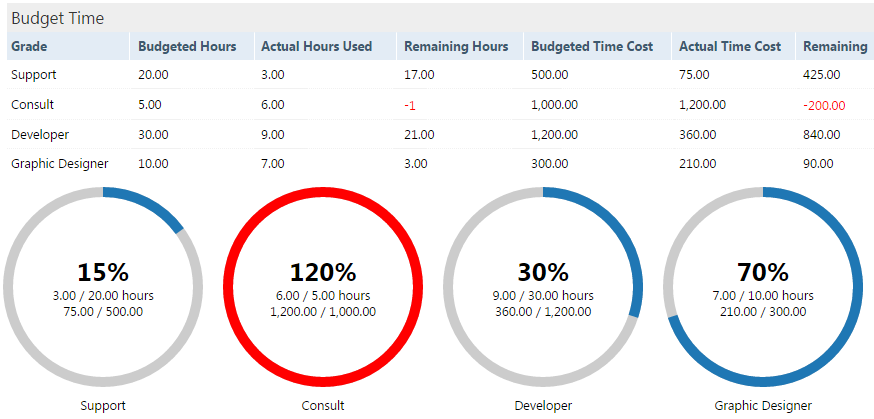
In this section, you will easily be able to see the Projects Actual Costs are doing in relation to the Projects Budgeted Costs. Information about your Budget is shown in both charts and easy to read Graphs.
The circle in these graphs gradually fills in as your Budget (or other related resource) is consumed. It has 3 different colors:
- Grey represents unused Resources
- Blue Represents used Resources
- Red Indicates that the Resource consumption has surpassed the Budget.
The tables shown will provide you with more details.
Budget Tracking is divided into 3 sections:
- Overall Time and Budget details:
This section displays information about your entire Budget in three graphs; one showing the overall progress of the Project (displaying elapsed Time using the dates and Work Efforts that have been set up in the Visual Workbench for the Project), the second graph indicates how many hours have been used out of the Budgeted Time for the Project, and the third shows how much money has been used out of your Total Budgeted Cost (this includes Time [adjusted by Cost Grades], and any other costs [such as Products, Supplies, etc]).

These graphs can be used to obtain a quick snapshot of how the Project is performing in relation to staying on Budget.
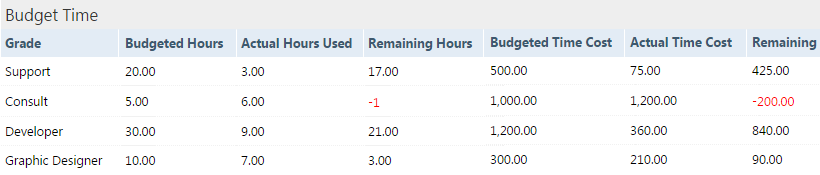
- Budgeted Time Details:
This section displays details about the Budgeted Time for the Project. Budgeted Time is shown separately for each of the Cost Grades which have Budgeted Time in the given Project. This will let you know at quick glance which particular Cost Grade is underutilized or overutilized.
- Budgeted Item Details:
The final section displays details about additional items which may consume the Budget for a Project. These items include: Products, Supplies, & Expenses.
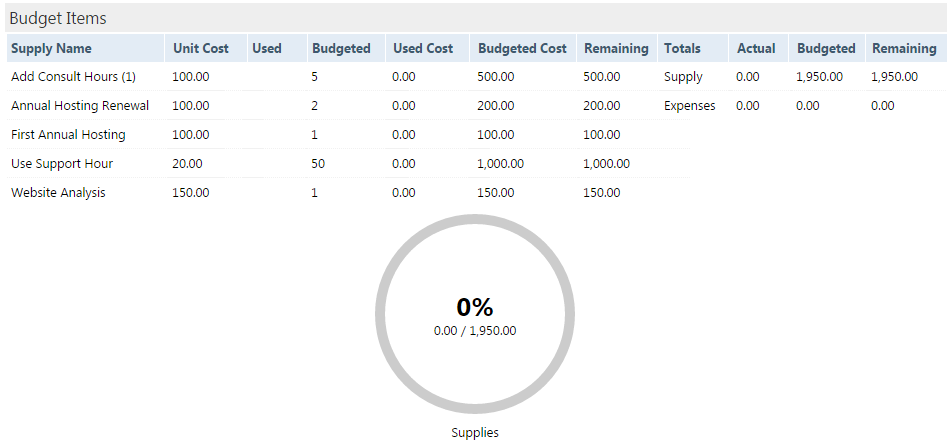
Using these tables and graphs, you can get a better picture of what exactly a Project is costing you. If for example something is showing as above Budget, and your Project is only halfway done, you can use this information to investigate and make required adjustments.
Adjusting Effort for Tasks
With the new and improved Estimates and Budgets features in BlueCamroo, we have also improved a lot of related functionality. One such function is Work Effort for Tasks. When a user is assigned a new Task, the assignor can include an Estimated Work Effort for the Task. Before, the assignee would only have the option to Accept or Reject the Task. But what if the assignor’s Estimated Work Effort was not feasible? We added a new ‘Adjust Effort’ button in addition to ‘Accept’ and ‘Reject’. This button will let the assignee adjust the effort for the Task and accept it.

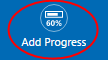
Add Task Progress
To make it easier for managers and employees to know the status of their numerous Tasks, we have added a % completion field for Adding Progress for Tasks. When you click the Add Progress button on a Task, the normal overlay still pops up, but there is now a field to add a Percentage Completion value.
Work Effort for Project Tasks
In order to give more accurate details and to accommodate for Estimate and Budget functionality, we have changed all Work Effort values for Project Tasks from Days to Hours.

|
Important! As a result of this change, all Work Effort values for your Project Templates and current Projects will be modified from days to hours. Hours will be calculated based on your pre-set Work Hours per day (found under the Project section of Setup > Company Defaults, Company Preferences). For example, if your Work Hours Per day is 8, and a task in a Project Template was set to 0.5 days before this release, it will be changed to 4 hours. Please ensure that your Work Effort for Project Templates & Current Projects are correct. |
Feedback Needed - Budget Reporting
In the future, we would like to add full reporting functionality for Budgets. Letting you compare the Budgets of Projects using the same Template, or seeing trends such as which Cost Grades are consistently being delivered over or under Budget. This will let you know if any adjustments need to be made to your Project template to make it more accurate and efficient. We would like to invite our users to submit suggestions for future Budget Reporting functionality, you can do so by sending an email to support@bluecamroo.com.
We hope you find these new features helpful. If you have any questions about implementing them, please send an email to support@bluecamroo.com We'll be glad to help!
The BlueCamroo Team
