Our User Interface Has Been Upgraded -
BlueCamroo Release Notes 7.0.0
What's New in BlueCamroo?
Over the past few years we have made many releases that are concentrated on the addition or upgrade of functionalities. In this release we wanted to bring in a long-overdue User Interface update.
We wanted the new UI to focus on individual user customization, so you can make your BlueCamroo Workspace truly your own. We’ve also added new features to make BlueCamroo more convenient.
Please view this video giving you a quick tour of the new UI
Key:

New Feature

Change to Existing Feature

Setup Instructions
New Main Menu
The Main Menu
 is your quick access to all of the different features in BlueCamroo. It’s now in only one place, the top left corner of the workspace, where you can collapse the menu to maximize your work space.
We have moved the Lightning Bolt of quick actions as the top item in the Menu and labeled
 .
.
The most beneficial upgrade to the Main Menu is that is now customizable for every user. You can set it up so you only see the sections you want and rearrange them by dragging-and-dropping.
In the All Sections
 option and you’ll see all of the sections available within BlueCamroo. Next to each section you’ll see a gray or green pin
 . By clicking on the pin you can affix it to your left menu and only see the sections you visit regularly.
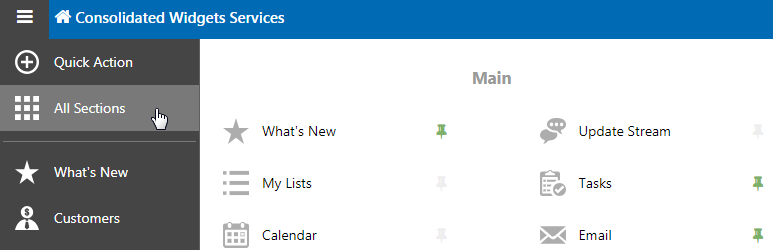
Clearing up the clutter from a workspace will make your day more efficient.
Finally, at the bottom of the Main Menu you will now have the access to the Setup, Recycle Bin, BlueCamroo Explorer and the Logout button.

Notifications & User Menu
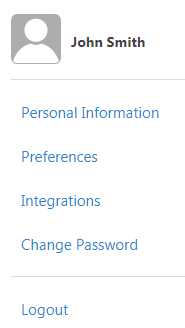

The Notifications and Utility Panel have been unified. On the top right you will find your Calendar Quick View, To-Do List, Timers, Notifications and the brand new User Menu. Now with new indicators.
The To-Do List will display a numbered indicator of your open items. The Timer will display a general indicator when a timer is running. And the Notifications will display a numbered indicator of new items that require your attention.
Clicking on your name will open the brand new User Menu where users can find quicker access to the areas in the setup where they can update their personal workspace.
Record Previews
In several sections that have a list of records, a new Preview button has been added. When you mouse over a specific record, a Preview button will appear next to the record name.
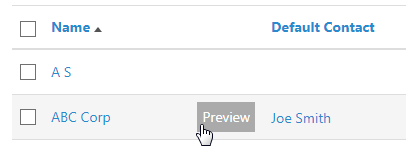
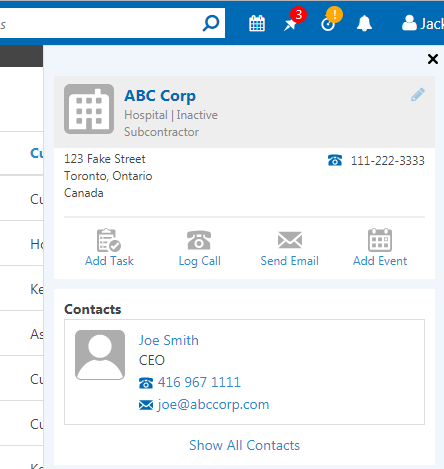
Clicking on it will open a Preview Pane on the right that has been customized for each type of record. This Preview Pane will allow you to quickly see important information (and take some actions) about that record without having to leave the list. For example, a salesperson can quickly cycle through a list and log calls in a more efficient way.
Record Summary & Menu
The Summary Pane for all Records has been updated. Navigation for each record has been moved to a menu on the right side making it cleaner and easier to work with. Like the Main Menu, you can pin preferred sections and
rearrange them. This menu can be collapsed by clicking on the icon
 .
.
You can customize a record’s Summary Pane from the new Details Page by clicking the record name. The Details Page cleanly displays all of the information about the record. If you wish to edit any details,
you can either click on the edit button next to the record name or in the Actions Bar. From the Details Page, you can also pin
desired info into the Summary Pane.
We’ve moved the Options from the record image into their own drop-down menu and we’ve also added quick action buttons to the summary pane:

Setup Area
The layout of the Setup Area has also been updated. And we have also added some quick action buttons for the most commonly used action in the setup.
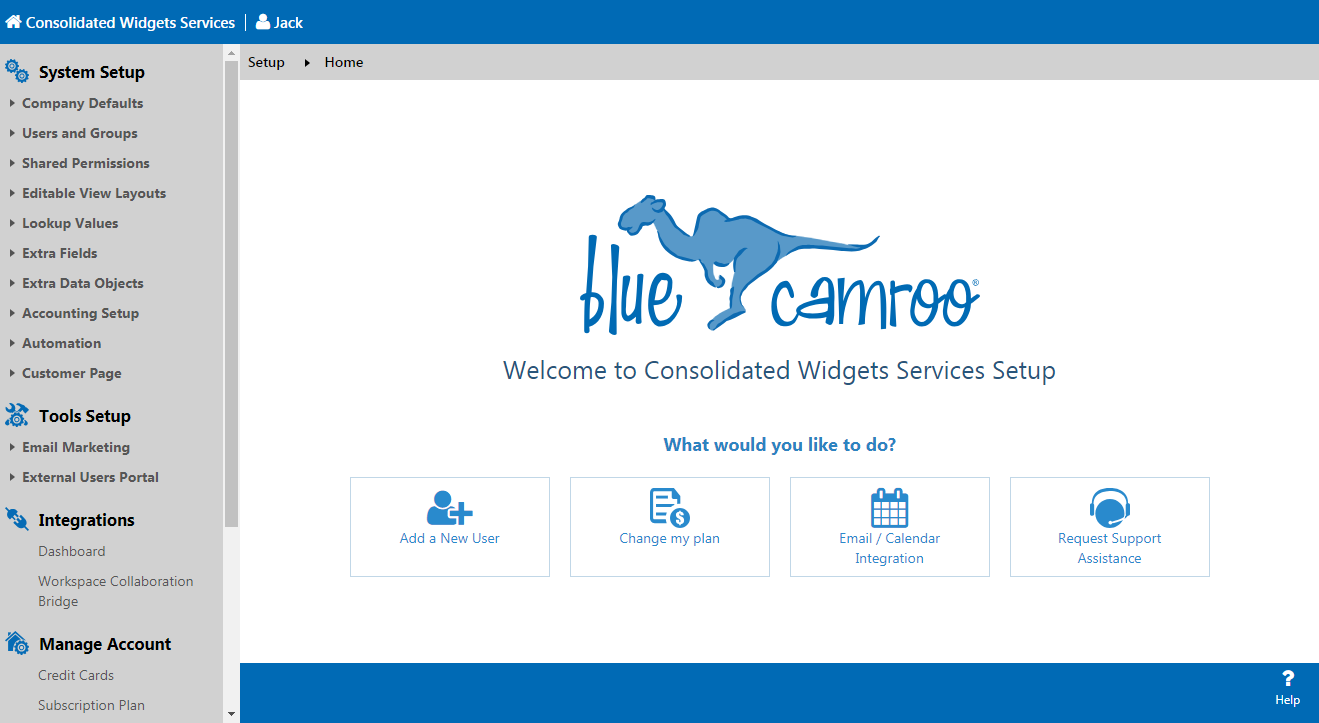
Without having to go looking for where the Add New User, Change My Plan, Email/Calendar Integration, and Request Support Assistance links are Admins can quickly find them as soon as they land in the Setup Area.
Home Page
Continuing with the theme of customization you are now able to easily personalize your Home Page. Instead of adding views from the setup section you can now create them by clicking Add View  on
the Actions Bar. You can now also add Task Views to your Home Page. Making the Home Page your own is easier than ever, drag and drop your view to organize them as you need them. Views can also be removed by clicking
the X at the top right of their title bar.
on
the Actions Bar. You can now also add Task Views to your Home Page. Making the Home Page your own is easier than ever, drag and drop your view to organize them as you need them. Views can also be removed by clicking
the X at the top right of their title bar.

We hope you find these new features helpful. If you have any questions about implementing them, or if you have any suggestions or comments, please send an email to support@bluecamroo.com. We'll be glad to help!
The BlueCamroo Team
